MrDevKnown

SELECT * FROM world WHERE humanity IS NOT NULL;

  • Home
  • About
  • Contact Us

This article will teach you how you can test your typing speed, but in programmer style, with Python. Check how fast you can type by making your own software to calculate the basic things needed to get the idea of your typing speed. We are going to use PyGame for making this software. You can also make this with Tkinter or other GUI. But PyGame is a bit useful for making these kind of GUIs, so I used it.

Download a suitable landscape background image you want for this app and rename that to "bg.jpg". Download a cartoon png from anywhere, or follow this link. Rename the character to "char.png".

Make a text file named typing.txt containing the collection of some sentences, e.g.,

The quick brown fox jumps over the lazy dog

Anyone who lives in Antarctica is their for a scientific research station.

Save all these files at one location on your device, inside the same directory (folder). 

 Install PyGame

  pip install pygame  

Type this command in your terminal: cmd, bash, etc.. and press enter (run).

  Code

Import modules

import pygame
from pygame.locals import *
import sys
import time
import random

Game class (contains all the functions for the game)

class Game:
    def __init__(self):
        self.w = 750
        self.h=500
        self.reset=True
        self.active = False
        self.input_text=''
        self.word = ''
        self.time_start = 0
        self.total_time = 0
        self.accuracy = '0%'
        self.results = 'Time:0 Accuracy:0 % Wpm:0 '
        self.wpm = 0
        self.end = False
        self.HEAD_C = (255,213,102)
        self.TEXT_C = (240,240,240)
        self.RESULT_C = (255,70,70)

        pygame.init()
        self.open_img = pygame.image.load('bg.jpg')
        self.open_img = pygame.transform.scale(self.open_img, (self.w,self.h))
        self.bg = pygame.image.load('bg.jpg')
        self.bg = pygame.transform.scale(self.bg, (self.w,self.h))
        self.screen = pygame.display.set_mode((self.w,self.h))
        pygame.display.set_caption('Type Speed test')

    def draw_text(self, screen, msg, y ,fsize, color):
        font = pygame.font.Font(None, fsize)
        text = font.render(msg, 1, color)
        text_rect = text.get_rect(center=(self.w/2, y))
        screen.blit(text, text_rect)
        pygame.display.update()
   
    def get_sentence(self):
        f = open('typing.txt').read()
        sentences = f.split('\n')
        sentence = random.choice(sentences)
        return sentence
   
    def show_results(self, screen):
        if(not self.end):
            #Calculate time
            self.total_time = time.time() - self.time_start
            #Calculate accuracy
            count = 0
            for i,c in enumerate(self.word):
                try:
                    if self.input_text[i] == c:
                        count += 1
                except:
                    pass
            self.accuracy = count/len(self.word)*100
            #Calculate words per minute
            self.wpm = len(self.input_text)*60/(5*self.total_time)
            self.end = True
            print(self.total_time)

            self.results = 'Time: '+str(round(self.total_time)) +"sec," +
" Accuracy: "+ str(round(self.accuracy)) + "%, " +
'Wpm: ' + str(round(self.wpm))
            # draw icon image
            self.time_img = pygame.image.load('char.png')
            self.time_img = pygame.transform.scale(self.time_img, (150,150))
            screen.blit(self.time_img, (self.w/2-115,self.h-140))
            self.draw_text(screen,"Reset", self.h - 93, 26, (100,100,10))
            print(self.results)
            pygame.display.update()
   
    def run(self):
        self.reset_game()
        self.running=True
        while(self.running):
            clock = pygame.time.Clock()
            self.screen.fill((0,0,0), (50,250,650,50))
            pygame.draw.rect(self.screen,self.HEAD_C, (50,250,650,50), 2)
            # update the text of user input
            self.draw_text(self.screen, self.input_text, 274, 26,(250,250,250))
            pygame.display.update()
            for event in pygame.event.get():
                if event.type == QUIT:
                    self.running = False
                    sys.exit()
                elif event.type == pygame.MOUSEBUTTONUP:
                    x,y = pygame.mouse.get_pos()
                    # position of input box
                    if(x>=50 and x<=650 and y>=250 and y<=300):
                        self.active = True
                        self.input_text = ''
                        self.time_start = time.time()
                    # position of reset box
                    if(x>=310 and x<=510 and y>=390 and self.end):
                        self.reset_game()
                        x,y = pygame.mouse.get_pos()
                elif event.type == pygame.KEYDOWN:
                    if self.active and not self.end:
                        if event.key == pygame.K_RETURN:
                            print(self.input_text)
                            self.show_results(self.screen)
                            print(self.results)
                            self.draw_text(self.screen, self.results,350, 28, self.RESULT_C)
                            self.end = True
                        elif event.key == pygame.K_BACKSPACE:
                            self.input_text = self.input_text[:-1]
                        else:
                            try:
                                self.input_text += event.unicode
                            except:
                                pass
            pygame.display.update()
        clock.tick(60)
   
    def reset_game(self):
        self.screen.blit(self.open_img, (0,0))
        pygame.display.update()
        time.sleep(1)
        self.reset=False
        self.end = False
        self.input_text=''
        self.word = ''
        self.time_start = 0
        self.total_time = 0
        self.wpm = 0
        # Get random sentence
        self.word = self.get_sentence()
        if (not self.word): self.reset_game()
        # drawing heading
        self.screen.fill((255,255,255))
        self.screen.blit(self.bg,(0,0))
        msg = "Typing Speed Test"
        self.draw_text(self.screen, msg, 80, 80,"red")
        # draw the rectangle for input box
        pygame.draw.rect(self.screen, (255,192,25), (50,250,650,50), 1)
        # draw the sentence string
        self.draw_text(self.screen, self.word,175, 28,"blue")
        pygame.display.update()
Run the game

Game().run()

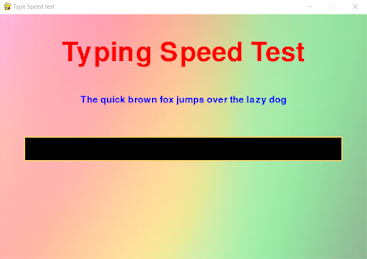
 Output

Now your game is ready.

Make a Python GUI app to test your typing speed - Python Game - PyGame Tutorial - Pencyl - mypencyl.blogspot.com

Make a Python GUI app to test your typing speed - Python Game - PyGame Tutorial - Pencyl - mypencyl.blogspot.com

 Summary

In this article you learnt about making an app to test your typing speed in Python with PyGame. You learnt about PyGame module.

Thanks for reading. Hope you liked the idea and project. Do comment down you opinions. Also, share this project with your friends and programmers.


   Idea

This article will teach you how you can count the number of words in JavaScript. You will learn about making a logic in JavaScript. We will make this project in react.

 Prerequisites

Basic knowledge of JavaScript (string operations), react JS basics.

  Code

Logic of the program

HTML part in React:

    <div className="form-group container p-4">

                /* buttons */
           <button disabled={text.length === 0} onClick={clear} className="btn  btn-primary" data-bs-toggle="tooltip" data-bs-placement="top" title="Tooltip on top"><i className="far fa-trash-alt"></i></button>
           <button disabled={text.length === 0} onClick={copy} className="btn  btn-primary"><i className="far fa-copy"></i></button>
           <button disabled={text.length === 0} onClick={upper} className="btn  btn-primary"><i className="far fa-text-size"></i></button>
           <button disabled={text.length === 0} onClick={capitalize} className="btn  btn-primary"><i className="fas fa-font-case"></i></button>
           <button disabled={text.length === 0} onClick={remove_space} className="btn btn-primary"><i className="fas fa-line-height fa-rotate-270"></i></button>

                /* Textarea */
           <textarea className="thetext form-control mb-4" value={text} onChange={handleOnChange} id="exampleFormControlTextarea1" rows="8"></textarea>
           <h4 className="mt-4">Text Count</h4>
           <div className="my-2">
           <p>{text.split(/\s+/).filter((element) => { return element.length !== 0 }).length} words and {text.split(' ').filter(s => s).join('').length} characters</p>
         
     </div >

Making a react component with this Logic

Using React UseState:

import React, { useState } from 'react'

export default function Form() {
    const clear = () => {
        let newtext = text.substr(0, -1);
        setText(newtext);
    }
    const handleOnChange = (event) => {
        setText(event.target.value);
    }
    const [text, setText] = useState("");
    return (
        <>
            <div className="form-group container p-4">

                {/* Textarea */}
                <textarea className="thetext form-control mb-4" value={text} onChange={handleOnChange} id="exampleFormControlTextarea1" rows="8"></textarea>
                <h4 className="mt-4">Text Count</h4>
                <div className="my-2">
                    <p>{text.split(/\s+/).filter((element) => { return element.length !== 0 }).length} words and {text.split(' ').filter(s => s).join('').length} characters</p>
                </div>
            </div >
        </>
    )
}

 Output

Now your Program is ready...


I just a used a little bootstrap and added some more buttons and extra logic to make this. I have already written a post on this whole site. Visit

 Summary

In this article you learnt about how you can count the no. of words and characters in React.

Thanks for reading. Hope you liked the idea and project. Do comment down you opinions. Also, share this project with your friends and programmers.


   Idea

This article will teach you how you can make a spinning donut with Python. It is a popular project in programming. The spinning donut is made in the languages such as C or C++. In this article, you'll learn how you can make the same with python.

 Prerequisites

Basic knowleddge of Python, knowledge of Classes and Functions in Python, how to install Python packages with pip, Knowledge about PyGame, math module and colorsys.

 Install Modules

  pip install pygame  

Type this command in your terminal: cmd, bash, etc.. and press enter (run).

  Code

Import modules

import pygame, colorsys, math

The logic

pygame.init()

white = (255, 255, 255)
black = (0, 0, 0)
hue = 0

WIDTH = 1920
HEIGHT = 1080

x_co, y_co = 0, 0

x_sep = 10
y_sep = 20

rows = HEIGHT // y_sep
columns = WIDTH // x_sep
screen_size = rows * columns

x_offset = columns / 2
y_offset = rows / 2

A, B = 0, 0  # rotating animation

theta_spacing = 10
phi_spacing = 1

big_chars = ".,-~:;=!*#$@"

screen = pygame.display.set_mode((WIDTH, HEIGHT))

display_surface = pygame.display.set_mode((WIDTH, HEIGHT))
# display_surface = pygame.display.set_mode((0, 0), pygame.FULLSCREEN)
pygame.display.set_caption('Donut')
font = pygame.font.SysFont('Arial', 18, bold=True)

def hsv2rgb(h, s, v):
    return tuple(round(i * 255) for i in colorsys.hsv_to_rgb(h, s, v))


def text_display(letter, x_co, y_co):
    text = font.render(str(letter), True, hsv2rgb(hue, 1, 1))
    display_surface.blit(text, (x_co, y_co))

# def text_display(letter, x_co, y_co):
#     text = font.render(str(letter), True, white)
#     display_surface.blit(text, (x_co, y_co))


run = True
while run:

    screen.fill((black))

    z = [0] * screen_size  # Donut. Fills donut space
    b = [' '] * screen_size  # Background. Fills empty space

    for j in range(0, 628, theta_spacing):  # from 0 to 2pi
        for i in range(0, 628, phi_spacing):  # from 0 to 2pi
            c = math.sin(i)
            d = math.cos(j)
            e = math.sin(A)
            f = math.sin(j)
            g = math.cos(A)
            h = d + 2
            D = 1 / (c * h * e + f * g + 5)
            l = math.cos(i)
            m = math.cos(B)
            n = math.sin(B)
            t = c * h * g - f * e
            x = int(x_offset + 40 * D * (l * h * m - t * n))  # 3D x coordinate after rotation
            y = int(y_offset + 20 * D * (l * h * n + t * m))  # 3D y coordinate after rotation
            o = int(x + columns * y)  
            N = int(8 * ((f * e - c * d * g) * m - c * d * e - f * g - l * d * n))  # luminance index
            if rows > y and y > 0 and x > 0 and columns > x and D > z[o]:
                z[o] = D
                b[o] = big_chars[N if N > 0 else 0]

    if y_co == rows * y_sep - y_sep:
        y_co = 0

    for i in range(len(b)):
        A += 0.00002 # for faster rotation change to bigger value
        B += 0.00001 # for faster rotation change to bigger value
        if i == 0 or i % columns:
            text_display(b[i], x_co, y_co)
            x_co += x_sep
        else:
            y_co += y_sep
            x_co = 0
            text_display(b[i], x_co, y_co)
            x_co += x_sep


    pygame.display.update()

    hue += 0.005

    for event in pygame.event.get():
        if event.type == pygame.QUIT:
            running = False
        if event.type == pygame.KEYDOWN:
            if event.key == pygame.K_ESCAPE:
                running = False

 Output

Now your game is ready. Just run the program and see the magic...


 Summary

In this article you learnt about making an app to display a rotating Donut in Python with PyGame module. You learnt about PyGame module.

Thanks for reading. Hope you liked the idea and project. Do comment down you opinions. Also, share this project with your friends and programmers.


 The internet is a place where people can stay connected to each other. If we look back to early 1900s, who would have thought that one day, we will be able to send images and pics of ourselves and places to almost anyone in this world so easily, without any form of hard prints of them. Then came early 1990s, where the internet started to develop. When web 1.0 came into use.

Web 1.0 marked a new thought of this whole world. Anyone could write anything on the web, which can be accessible to anyone on the web. It was a huge step to develop the human civilization. The years it took to the first printing press is much much higher than the time it took to come to email.

With the increase in technology, the needs and demands also increase... Everything has some faults, we just need to continue working to make it better. Thus, next comes the idea of Web 2.0.

Earlier, in Web 1.0, we could only have static pages on web, to display some kind of information. As a result, a normal person could not publish their information, upload something onto servers and display them as per the needs. After few years of evolution, then came Web 2.0, which changed the whole system. We could now, upload things as well on the internet and provide some information.

The age of Web 2.0 gave us the present world of Social Network, we are living in. In 2004, Mark Zuckerberg created Facebook, that is probably the most innovative thing I could give an example of to explain Web 2.0. Now we know how big company Facebook has become... Oh sorry, I had to say, how big company Meta has become. And here comes another concept of the internet, the Web 3.0...

Currently we are living in an age of Web 2.0 (when this post was published). And if you are in technical fields, you must have heard of Web 3.0 in current years. If you want to know about Web 3.0, scroll down... Because, I went a lot out of topic already.


So, the title of this post is about giving access to personal information via images. So, as I explained you that currently, we are living in Web 2.0. It also has some flaws. Like, every information we are uploading on internet is stored on a server somewhere. So, anything is not completely secure on the internet. 

If you are aware with some Image sharing websites, I might not take their names, they use a concept to share your images. That is, Exchangeable Image File Format (EXIF). "It is metadata contained in an image file, and although it varies among devices, it can provide valuable information such as the make and model of the camera that took the image of a system, as well as whether an image was altered with a graphics program. EXIF data also often will have a date and timestamp of when the image was taken or altered. There are several EXIF formats; therefore, the data can vary slightly. Also be aware that not all devices will propagate all the data."

Well, I guess the above sentences are a bit confusing, so simply, EXIF files are those data files that store your personal information. And, as I talked about the concept used by Image sharing websites, as we upload an image, these data are also stored with it.

Although, some social media platforms like Fb, Instagram say that they remove this EXIF data from the image. But, the question is you can't trust anyone on the internet. Because, remember, if you are not paying for anything, then you are the product for them. And, they are even alleged that they sell the data to third party apps.

Let me tell you about an interesting story...

John McAfee, of course, the founder of anti-virus company McAfee. And the authorities in Belize have named John McAfee as a “person of interest” after one of his neighbors was found shot dead. He used to tell people on the internet about his escapades via blogging. But he did a mistake. He uploaded a photo on the blog. But, the EXIF data revealed his location to the police.

John McAfee - EXIF data - MrDevKnown

John McAfee was caught because of this EXIF file.

I made this article, because lot of you might not be aware of this thing.

So the question is, how can you delete these EXIF data before uploading a file? Well, there are a lot of softwares in the market that help you remove this file. You can use them before uploading any pic on an image sharing website.

Also, tell me if you want me to make a free software to remove the EXIF files from your photos in the comments below. And you can even contact me via email... Contact

So, as I told you to explain about Web 3.0 at last. So, you must have heard Torrent browser. If I explain you its working, it would be a typical thing to understand. If I explain you in simple, then unlike what we normally have a structure of an Application, Torrent uses a different approach. The normal Web App send the data to a server. But Torrent is peer to peer. Means, there is a temporary connection between the client and the other person. If you want to go in deep, you can read many articles on web about "Torrent working".

So, the Web 3.0 uses that concept. The information will not be stored on any server anywhere. So, this will make the internet a little more secure. But since, it is not that easy to develop that kind of structure in few years, the technology will take time to come in use.


So, I think that's it for the post. And this might be the first post of this month and the last post of this year, one day before Christmas. So, Merry Christmas and Happy New Year to all. Also Reader, tell your friends that I wished all of them too...


How to create a website in Python - Python Flask tutorial - First basic website

Python is a very popular language right now. Many big companies are using it. Python is used in most of the fields. You can create softwares, basic games as well as websites in Python. In web development, Python's libraries are considered very good for making backends. Even companies like Netflix use Python in their backend.

Basically, there are two main Python libraries, with which you can learn wen development and create a backend for your site. First is Flask, the other is Django. Flask is a little simple.

Here I will show how you can make your first Python website with Flask...

Process

  • Install the Flask library, by running the command pip install flask in your terminal.
  • Then you are ready for making your first Flask App
  • To get your first app, Create a new file and paste the below code. This is the basic structure of a Flask application.

The Code

from flask import Flask, app
import flask

app = Flask(__name__)

@app.route("/")
def index():
    return "Just testing! Hello Sir! I am a web app"

if __name__ == "__main__":
    app.run(host="127.0.0.1", port=8080, debug=True)

Congratulations, you have made your first Flask app.

Now open the terminal and run the command flask run


Previous Post:
Make your own Web Browser in Python using PyQt5. PyQt5 is a very powerful Python framework to make modern GUIs. With help of Python PyQt5 QtWebWidgets, it is very easy to amke your own custom web browser with a few lines of code.

PyQt5 Basic code


import sys
from PyQt5.QtCore import *
from PyQt5.QtWidgets import *

class MainWindow(QMainWindow):
    def __init__(self):
        # Main Window
        super(MainWindow, self).__init__()
        self.showMaximized()

app = QApplication(sys.argv)
QApplication.setApplicationName("Browser")
window = MainWindow()
app.exec_()


PyQt5 Browser code using QtWebEngine


Full Article

Program to find roots of a quadratic equation in Python.

In this post, you will learn to find the roots of a quadratic equation with python.

The Logic
  • We will ask the user to one by one input all the coefficients of the the quadratic equation.
  • Then we are going to use the quadratic formula, i.e. Sridharacharya formula to find the roots of the equation.
  • Then we will check if both the roots are equal or not
  • If both are unequal, we will print them else, we will print one root.
The Code

a = int(input("Enter the coefficient of x\u00b2: "))
b = int(input("Enter the coefficient of x: "))
c = int(input("Enter the numerical coefficient: "))

eq_p = (-b + (b**2 - 4*a*c)**(1/2)) / 2*a
eq_n = (-b - (b**2 - 4*a*c)**(1/2)) / 2*a

if eq_p != eq_n:
    print("The roots of the quadratic equations are:", eq_p, "and", eq_n)
else:
    print("The root of the quadratic equations is:", eq_p)

The Output


Make your own Python Web Browser:

Make your own Web Browser in Python using PyQt5. PyQt5 is a very powerful Python framework to make modern GUIs. With help of Python PyQt5 QtWebWidgets, it is very easy to amke your own custom web browser with a few lines of code.

PyQt5 Basic code


import sys
from PyQt5.QtCore import *
from PyQt5.QtWidgets import *

class MainWindow(QMainWindow):
    def __init__(self):
        # Main Window
        super(MainWindow, self).__init__()
        self.showMaximized()

app = QApplication(sys.argv)
QApplication.setApplicationName("Browser")
window = MainWindow()
app.exec_()
Full Article


In this post, you will get the free source code of a simple GUI image editting software, made in Tkinter, Python.

The Code


from tkinter import *
from tkinter import ttk
from tkinter import filedialog
from tkinter.filedialog import askopenfilename, asksaveasfilename
from PIL import Image, ImageTk, ImageFilter, ImageEnhance, ImageOps
import os

# main window
root = Tk()
root.title("PhotoEditor")
root.geometry("640x450")

# color code
color = {
    "background": "#009973",
    "canvas": "#00b386",
}

# functions
def selected():
    global img_path, img
    img_path = filedialog.askopenfilename(initialdir=os.getcwd()) 
    img = Image.open(img_path)
    img.thumbnail((350, 350))
    img1 = ImageTk.PhotoImage(img)
    canvas2.create_image(300, 210, image=img1)
    canvas2.image=img1
    ui_controls()
    root.geometry("640x650")
    selectbtn.place(x=100, y=595)
    savebtn.place(x=280, y=595)
    exitbtn.place(x=460, y=595)


def blur(event):
    global img_path, img1, imgg
    for m in range(0, v1.get()+1):
            img = Image.open(img_path)
            img.thumbnail((350, 350))
            imgg = img.filter(ImageFilter.BoxBlur(m))
            img1 = ImageTk.PhotoImage(imgg) 
            canvas2.create_image(300, 210, image=img1)
            canvas2.image=img1


def brightness(event):
    global img_path, img2, img3
    for m in range(0, v2.get()+1):
            img = Image.open(img_path)
            img.thumbnail((350, 350))
            imgg = ImageEnhance.Brightness(img)
            img2 = imgg.enhance(m)
            img3 = ImageTk.PhotoImage(img2)
            canvas2.create_image(300, 210, image=img3)
            canvas2.image=img3


def contrast(event):
    global img_path, img4, img5
    for m in range(0, v3.get()+1):
            img = Image.open(img_path)
            img.thumbnail((350, 350))
            imgg = ImageEnhance.Contrast(img)
            img4 = imgg.enhance(m)
            img5 = ImageTk.PhotoImage(img4)
            canvas2.create_image(300, 210, image=img5)
            canvas2.image=img5

# All ui
select = False
img1 = None
canvas2 = Canvas(root, width="600", height="420", relief=RIDGE, bg=color["canvas"], bd=0)
canvas2.config(highlightbackground=color["background"])
canvas2.place(x=15, y=15)

v1 = IntVar()
v2 = IntVar()
v3 = IntVar()

style = ttk.Style()
style.configure("TScale", background=color["background"])

def ui_controls():
    blurr = Label(root, text="Blur:", font=("ariel 17 bold"), width=9, anchor='e')
    blurr.configure(bg=color["background"])
    blurr.place(x=170, y=455)
    blur_scale = ttk.Scale(root, from_=0, to=10, variable=v1, orient=HORIZONTAL, style="TScale", command=blur)
    blur_scale.place(x=305, y=460)

    bright = Label(root, text="Brightness:", font=("ariel 17 bold"))
    bright.configure(bg=color["background"])
    bright.place(x=163, y=495)
    bright_scale = ttk.Scale(root, from_=0, to=10, variable=v2, orient=HORIZONTAL, command=brightness)
    bright_scale.place(x=305, y=500)

    contrast = Label(root, text="Contrast:", font=("ariel 17 bold"))
    contrast.configure(bg=color["background"])
    contrast.place(x=190, y=535)
    contrast_scale = ttk.Scale(root, from_=0, to=10, variable=v3, orient=HORIZONTAL, command=contrast) 
    contrast_scale.place(x=305, y=540)

selectbtn = Button(root, text="Select Image", bg="royalblue", fg="white", font=("ariel 15 bold"), relief=GROOVE, command=selected)
selectbtn.place(x=100, y=395)

savebtn = Button(root, text="Save", width=12, bg='royalblue', fg='white', font=('ariel 15 bold'), relief=GROOVE)
savebtn.place(x=280, y=395)

exitbtn = Button(root, text="Exit", width=12, bg='red', fg='white', font=('ariel 15 bold'), relief=GROOVE, command=root.destroy)
exitbtn.place(x=460, y=395)


# menu bar
my_menu = Menu(root)
root.config(menu=my_menu)
root.configure(bg=color["background"])

#file menu
file_menu = Menu(my_menu, tearoff=False)
file_menu.add_command(label="New")
file_menu.add_command(label="Save as")
file_menu.add_command(label="Save")
file_menu.add_command(label="Open", command=selected)
file_menu.add_separator()
file_menu.add_command(label="Exit", command=root.quit)
my_menu.add_cascade(label="File", menu=file_menu)

# __main__
root.mainloop()


This is how the software looks...


Newer Posts Older Posts Home

ABOUT ME

Web developer, designer. A self taught programmer. Don't hesitate to come for say a small "hello!"
Shivesh Tiwari

POPULAR POSTS

  • How to make Windows 11 Website Design | Adding Working App Windows | Dark Mode and other things
  • Complete guide on managing code with Github (Git Tutorial)
  • How to create a shining / glowing effect around the cursor on mouse hover over a div? Glassmorphism Tutorial
  • Javascript code to display a welcome message after accepting the name of the user using a prompt box
  • Music Player web app made in HTML, CSS, Javascript
  • Qt Designer UI to python file export
  • Python PyQt5 complete Setup Windows
  • PyQt5 draggable Custom window code
  • Make a Windows 11 themed Website - HTML, CSS Windows 11 design
  • Top must have windows software for a developer

Categories

  • best javascript project 12
  • code 5
  • dino game 1
  • dislike 1
  • easy python projects 9
  • flask 1
  • free python code 10
  • game 2
  • git 1
  • github 1
  • hack 2
  • hack chrome dino game 1
  • hack game 1
  • html best website 4
  • javascript website 6
  • learn javascript 9
  • learn programming 13
  • learn python 15
  • like 1
  • like dislike system php 1
  • mrdevknown 5
  • music player 1
  • notification 1
  • php 2
  • programming 9
  • project 9
  • pyqt5 4
  • python 16
  • python IDE 2
  • python projects 8
  • React 5
  • react js 6
  • software 5
  • Tkinter 2
  • web app 4
  • website 4
Powered by Blogger
MrDevKnown

Search This Blog

Archive

  • August 20231
  • March 20231
  • December 20221
  • September 20222
  • August 20221
  • June 20221
  • March 20221
  • January 20226
  • December 20211
  • November 20213
  • October 202111
  • September 20213
  • August 20213
Show more Show less
  • Home
  • About
  • Contact Us

Subscribe

Posts
Atom
Posts
All Comments
Atom
All Comments

Subscribe

Posts
Atom
Posts
All Comments
Atom
All Comments

Categories

  • React5
  • Tkinter2
  • best javascript project12
  • code5
  • dino game1
  • dislike1
  • easy python projects9
  • flask1
  • free python code10
  • game2
  • git1
  • github1
  • hack2
  • hack chrome dino game1
  • hack game1
  • html best website4
  • javascript website6
  • learn javascript9
  • learn programming13
  • learn python15
  • like1
  • like dislike system php1
  • mrdevknown5
  • music player1
  • notification1
  • php2
  • programming9
  • project9
  • pyqt54
  • python16
  • python IDE2
  • python projects8
  • react js6
  • software5
  • web app4
  • website4

Translate

Pages

  • Home
  • Privacy Policy

Popular Posts

Music Player web app made in HTML, CSS, Javascript

Music Player web app made in HTML, CSS, Javascript

August 03, 2021
Top must have windows software for a developer

Top must have windows software for a developer

September 17, 2022
Javascript code to display a welcome message after accepting the name of the user using a prompt box

Javascript code to display a welcome message after accepting the name of the user using a prompt box

August 20, 2022

Trending Articles

  • How to make Windows 11 Website Design | Adding Working App Windows | Dark Mode and other things
  • Complete guide on managing code with Github (Git Tutorial)
  • How to create a shining / glowing effect around the cursor on mouse hover over a div? Glassmorphism Tutorial
  • Javascript code to display a welcome message after accepting the name of the user using a prompt box

Popular Posts

  • Music Player web app made in HTML, CSS, Javascript
  • How to create a shining / glowing effect around the cursor on mouse hover over a div? Glassmorphism Tutorial
  • Javascript code to display a welcome message after accepting the name of the user using a prompt box

Labels

Distributed By Gooyaabi | Designed by OddThemes
